Showing posts with label Blogger Tips. Show all posts

March 3, 2010

How to Replace Posting Date with a Calendar Icon

Calendar Icon
Changing the posting date with a calendar icon will make your blog more beautiful. It will not make your page load be slower because the image size is only 3kb. You can do it by raeading this tutorial carefully, so keep a close eye on it.

Here are The Steps to Change Your Posting Date with a Calendar Icon


1. Login to your Blogger account

2. Choose Layout » Edit HTML, then check the Expand Widget Templates. Before we do more, please backup you template to prevent any mistkes.

3. If you're done, find the following code:
<title><data:blog.pageTitle/></title>

and just after it, place the next code:
<script type='text/javascript'>
//<![CDATA[
/* http://blogger-driver.blogspot.com */
function date_replace(date) {
var da = date.split('.');
var day = da[1], mon = da[0], year = da[2];
var month =
['0','Jan','Feb','Mar','Apr','May','Jun','Jul','Aug','Sep','Oct','Nov','Dec'];
document.write("<div class='month'>"+month[mon]+"</div> <div class='day'>"+day+"</div>");
}
//]]>
</script>


4. Find ]]></b:skin> code, then paste the next code just before it:
.dateblock {
background: url(http://tipsbloggerzacky.googlecode.com/files/bluecalend.gif)
no-repeat;
width: 55px;
margin: 0;
font-weight: bold;
height: 50px;
/*position: absolute;
top: 0;
left: 0;*/
float: left;
text-align: center;
}
.month {
font-size: 11px;
width: 37px;
margin: 0 5px;
text-transform: uppercase;
color: #fff;
}
.day {
color:#3366CC;
font-size: 19px;
width: 37px;
margin: 0 5px;
}


note:
- http://tipsbloggerzacky.googlecode.com/files/bluecalend.gif is your calendar icon url, you can replace it with this icons:

Green Calendar Icon Orange Calendar Icon Pink  Calendar Icon Purple Calendar Icon Red Calendar Icon Yellow Calendar Icon

- #3366CC is your date font color, you can change it by reading this html color codes post.

5. Finally, click Save Template.

Click here for the demo test.

Good luck...

read more »

February 9, 2010

Optimize Blog Title to Get a Better Search Result

Optimize Blog Title
Title usually located in front of the blog posting title. As the smart seo, optimize title that will affect us in creating blogs in the top rank search results. Surely people would prefer to vote click on the search results display the title of the posting directly. Examples of this in my blog.
If you are using tricks to change the title of your blog post title then it would be great to go into the front ranks of search engines, or more Search Engine Friendly.

Changing Blog Title with Post Title


1. Login to your Blogger account

2. Select Layout » Edit HTML

3. Find the following code:

<title><data:blog.title/></title>

or

<title><data:blog.pageTitle/></title>


4. Replace code with:

<b:if cond='data:blog.pageType == &quot;index&quot;'>
<title><data:blog.title/></title>
<b:else/>
<title><data:blog.pageName/></title>
</b:if>


5. Finally, click Save Template.

To the main page title will remain the title of the blog. But if you try to open a post, the post title would later become the title of the blog.

Good luck...
Under Construction

read more »

How to Change or Edit Bogger Template

For the Blogger, the blog is a house. Of course we want our house look beautiful and more beautiful than others. Many ways in which to create a blog becomes more beautiful, such as by adding knick knacks and also by changing its template. If we replace the template with a template that has provided a blogger then it is the easiest way, Just choose a direct store. But the template provided very little and it looks too standard, so we look for another template more expressive and interesting. What else now so many sites that provides free templates, including this blog (hehehe ...).

Not as easy as we thought when replacing the template with a template that is not provided by Blogger, because there are some consequences. Among other things, you will lose element2 yan template or even your blog so badly damaged. In this tip, I'll try to explain how to anticipate it.

1. You have to backup the template before long if the new template was not successfully installed. Click here for how to backup the template.

2. Backup elements or widgets that have been installed. Go to Page Element menu, there are already installed widgets. Click edit link each below of widgets, copy the contents of that element and put it in a notepad or any text editor.

3. If the template and have the backup elemen2, then upload the new template that you have downloaded. Usually in .xml file, but some are in the archive file (. zip or .rar). For that you need to extract them first to get the .xml file. After that go to Edit HTML, there click the browse button to find a template to be used, then click upload.

4. If there are several different elements with the old template, you will get a confirmation or deletes elements. After that, click the Confirm & Save.

5. Before the stage of the last one to save the template, you should see the first template that you have to edit this by clicking Preview. If it looks less according to what you want, click Clear Edits the template will be back as before editing.

Good luck...

read more »

February 3, 2010

How to Add More Shoutmix Emoticons

Previously, I have posted a tips to add chatbox with Shoutmix to your blog. Shoutmix has its default emoticons, now I'll tell you to add more its emoticons. For the free version, you only can 10 emoticons, but in premium you can use up to 500 custom smileys. How to do it? Let me explain more.

Steps to Add More Shoutmix Emoticons

1. Login to your Shoutmix account

2. Look at the Display menu, klik Smileys

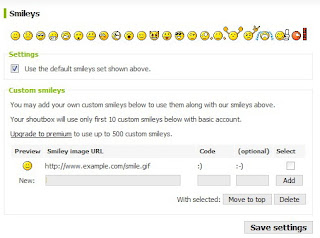
3. After that the following screen will be appear:

Shoutmix Emoticon

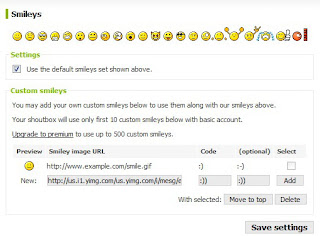
4. To add more emoticons, enter the icon url into Smiley Image URL box, for example you can enter url of Yahoo Messenger Emoticons and add their shortcut keys

Shoutmix Emoticon

5. Finally, klik Save Settings.

Good luck...

read more »

How to Make Blogger Search Form

Nowadays, search engine can't be separated from internet world. With search engine, we can look for something that we want to know by typing its keyword. And know, I'll tell you how to add search form to your blog although there are many blogger templates had been already installed its search form, but by reading this tips you will know how to make and costumize it.

Steps to Make Blogger Search form


1. Login to your Blogger account

2. Go to Layout » Page Elements

3. Add Page Elements with HTML/Javascript, then paste the next code to content box:

<style>
#searchform {
overflow:hidden;
display:inline;
vertical-align:middle;
}
#searchbox {
background: #333; /*form background color*/
width: 200px; /*form width*/
color: #fff; /*form text color*/
font-size: 12px;
font-family: Georgia, Times New Roman, Trebuchet MS;
font-weight: normal;
margin:0 0 0 5px;
padding: 2px 0 3px 5px;
display: inline;
vertical-align:middle;
border:1px solid #333; /*form border*/
}
#searchbutton {
background: #333; /*button background color*/
color: #FFF; /*button text color*/
font-size: 11px;
font-family: Georgia, Times New Roman, Trebuchet MS;
margin:0 0 0 5px;
padding: 2px 2px 2px;
font-weight: bold;
border:1px solid #333; /*button border*/
}
</style>

<form action='/search' id='searchform' method='get'>
<input id='searchbox' name='q' onblur='if(this.value==&quot;&quot;)this.value=this.defaultValue;' onfocus='if(this.value==this.defaultValue)this.value=&quot;&quot;;' type='text' value='Search here...'/>
<input id='searchbutton' type='submit' value='GO'/>
</form>

4. Finally, click Save.

Good luck...

read more »

How to Create a Guest Book / Shoutbox in Blog

Guest Book, or in any other term Shoutbox, Say Box, Tag Board, and the Chatter Box is a box that serves to send short messages, but can also serve as a place to talk (chat). With Guestbook / Shoutbox, we can promote our blog. For example, we visited blogs of people who provide this box and then we comment or just simply greeting them in the shoutbox, and who have a blog to see the shoutbox, usually they will return to visit our blog.

Usually Guestbook / Shoutbox inserted into a web page / blog with the JavaScript language. For those of you that good programming java script might make your own by making the code a real headache. But do not make you a candidate not to worry because nowadays many internet sites that provide this service, one of which is Shoutmix.

Here's How to Create a Guest Book / Shoutbox with Shoutmix

1. Open Shoutmix.com then register yourself. Pendaftarnnya way quite easily.

2. If your application directly managed given the choice of the type provided shoutbox. After that, click the Continue button.

3. Click the link Go to My Control Panel Now. There you can Shoutbox first setting, for example, Style & Color, Date & Time, and others.

4. Then click Get Codes and set the height and width of your Shoutbox. Then copy and paste the script in the box Generated Codes.

5. Login to your Blogger account.

6. Select Layout » Add Page Elements » HTML / Javascript.

7. Paste the code that you copied into the Content box.

8. Click Save.

Shoutmix widget now you're ready and has appeared on your blog.

Good luck ...

Don't foregt to leave a comment...

read more »

January 27, 2010

A Basic HTML Dropdown Menu

With Dropdown Menu, we can save space in our blog because of its small size could save the link and text a lot. Can be filled with the archive, blogroll, etc..

For the first time, I will explain you to make the basic dropdown menu. Here are the steps:

1. Login to your Blogger account.

2. Select Layout > Page Elements > Add Page Elements > HTML / JavaScript

3. Enter the following script into the content box:

<select onChange="document.location.href=this.options[this.selectedIndex].value;">
<option value="0" selected>Arsip Blog</option>
<option value="Links 1">Text 1</option>
<option value="Links 2">Text 2</option>
</select>


Red text is a link, replace it with your link.
Blue text is the text that is displayed. You must also change.

Example:

<select onChange="document.location.href=this.options[this.selectedIndex].value;">
<option value="0" selected>Arsip Blog</option>
<option value="http://tips-blogger-zacky.blogspot.com/2009/11/tentang-blogger.html">Tentang Blogger</option>
<option value="http://tips-blogger-zacky.blogspot.com/2009/11/cara-memback-up-template-blogger.html">Cara Memback-up Template Blogger</option>
<option value="http://tips-blogger-zacky.blogspot.com/2009/11/cara-melindungi-blog-dari-penjiplakan.html">Cara Melindungi Blog Dari Penjiplakan</option>
</select>


Result:


To add more menus, add <option value="Links 2">Text 2</option> code before the </select> code.

The links in the dropdown menu above, if the click will open a link on the same page. This is suitable for Archives and links related to the blog.
There is one more type of link that if clicked it will open a new window without closing your blog. Which is suitable untu Friend Blogroll or links. There is code that must be replaced:

<select onChange="document.location.href=this.options[this.selectedIndex].value;">


with this one:

<select onchange="javascript:window.open(this.options[this.selectedIndex].value);">


How? Easy? Good luck ...

Don't forget to leave a comment ...

read more »

January 24, 2010

How to Make Labels in Blogger

You have to give one or more categories to your blog posts. It uses to make your visitor easier choose the post which they want to read. In Blogger, category is called Label.

Steps to Make Labels in Blogger

  • Login to your Blogger account
  • Go to Post » Edit Post
  • Select the post which you will give label
  • Look at the label action, choose New
    Label
    then type label name which you want.

Blogger Labels

How to Delete Label

Select the post, then choose Remove Label

How to Change Label

Remove the existing Label, then create a new one.

How to Display Label in Blog

  • Go to Layout » Page Elements
  • Add Page Elements by clicking add gadgets and choose Labels
  • Set it up, then click Save.
We are done. Good luck...

read more »

How to Back-up Blog

You have to back-up your blog to prevent any mistake that will make your blog lost. We can use a free service to do it, such as BlogBackupOnline. With BlogBackupOnline, we can easily back-up our blog. This servive only give 5MB space. I think 5MB space is enough to to back-up our blog data. If we have posted with approximately 1000 characters for each post, so this service can back-up 1000 posts. But, for a free service we can't back-up pictures and videos, we only can back-up text in articles. Wanna try it?

Steps to Back-up Blog with BlogBackupOnline

  • Go to BlogBackupOnline.com and register your account. After that, you will be sent a confirmation email to activate your account
  • If your account has been activated, login to your BlogBackupOnline account
  • Register your blog by clicking Start Registering Your Blog button
  • Enter your blog address to a blank box, then click Register Blog
  • Click Start Full Backup button, and wait the back-up process done.

How to Restore Our Back-up Data ?

Go to your Dashboard, then click Manage button. Choose Content menu, there you can restore your back-up data.

What do you think about this service? I think you have to answer "nice" than you have to rewrite your post if lost it, right?

Good luck...

read more »

January 21, 2010

How to Back-up Blogger Template

BackupBloggers must often edit the template provided, because templates slightly less and the facility is not like in Wordpress. But Blogger has benefits that we can modify an existing template as one likes us, not like in Wordpress. In WordPress, if we want to edit the template must be paid first, iiihhhh, we are rich? We're the poor... Hahaha...

Here are Simple Steps to Back-up Your Template

1. Login to your Blogger account.

2. Select Layout > Edit HTML

3. On the Edit HTML tab is "Before editing your template, you may want to save a copy of it." Click Download Full Template and save the file, usually in .xml format

If you want to install a new template or templates that have been edited, or want to return to the previous templates you can click on the Upload button that is underneath.

Ok, Good luck...

read more »

About Blogger

Blogger LogoBlogger or Blogspot what is now familiar among bloggers. Free blog service providers are large companies that compete with Wordpress so that practically a free blog provider of best-selling number one in the world.

Blogger is actually a blog-publishing system (blog publishing system) which was initially created by Pyra Labs in August 23, 1999 and is a dedicated blog-publishing tool designed kaliyang first to help popularize the format. In February 2003, due to its popularity, eventually Pyra Labs was acquired by Google. The acquisition premium features memnyebabkan previously charged, and then changed for free.

In 2004, Google introduced a new service Picasa, which is an application for organizing and editing digital photos. This service then integrate with photo sharing utility Hello into Blogger service, which allows a Blogger users to post their photos in your blog made.

On May 9, 2004, Blogger redesigned its main show, the various changes made in Blogger to add various features such as web standards-compliant templates, individual archive pages for posts, comments and posting menggunankan email.

On 14 Agustus2006, Blogger launched its latest release in the beta with Invader code, along with the Gold release version. This Blogger users make the migration to Google's servers and is accompanied by the addition of several new features in it.

In December 2006, finally the latest version of Blogger is no longer in beta and in the month of May 2007, Blogger has completely moved to the Google servers.

Technorati token code: QRGUX8FKWJH4

Yahoo

Twitter

Technorati

Stumbleupon

Reddit

Newsvine

Mixx

Linkedin

Google Bookmakrs

Facebook

Digg

Delicious

read more »

Join InstaForex Get 30% Bonus!

Spread this Blog!Bookmark This Blog!

Facebook Twitter Google Buzz Delicious Digg Stumbleupon Linkedin
Yahoo! Bookmarks Google Bookmarks Reddit Mixx Technorati Subscribe via Email Subscribe via RSS Feed
Blogger Driver FeedCount
Receive our updates direcly to your inbox
Please fill the form below:

Chatbox

Followers

Visitor Traffic