Showing posts with label Shoutbox. Show all posts

February 3, 2010

How to Add More Shoutmix Emoticons

Previously, I have posted a tips to add chatbox with Shoutmix to your blog. Shoutmix has its default emoticons, now I'll tell you to add more its emoticons. For the free version, you only can 10 emoticons, but in premium you can use up to 500 custom smileys. How to do it? Let me explain more.

Steps to Add More Shoutmix Emoticons

1. Login to your Shoutmix account

2. Look at the Display menu, klik Smileys

3. After that the following screen will be appear:
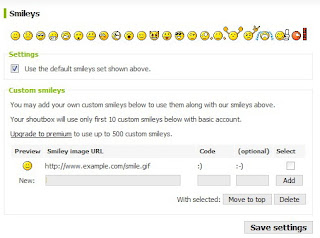
Shoutmix Emoticon

4. To add more emoticons, enter the icon url into Smiley Image URL box, for example you can enter url of Yahoo Messenger Emoticons and add their shortcut keys
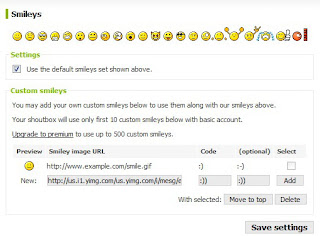
Shoutmix Emoticon

5. Finally, klik Save Settings.

Good luck...

read more »

How to Create a Guest Book / Shoutbox in Blog

Guest Book, or in any other term Shoutbox, Say Box, Tag Board, and the Chatter Box is a box that serves to send short messages, but can also serve as a place to talk (chat). With Guestbook / Shoutbox, we can promote our blog. For example, we visited blogs of people who provide this box and then we comment or just simply greeting them in the shoutbox, and who have a blog to see the shoutbox, usually they will return to visit our blog.

Usually Guestbook / Shoutbox inserted into a web page / blog with the JavaScript language. For those of you that good programming java script might make your own by making the code a real headache. But do not make you a candidate not to worry because nowadays many internet sites that provide this service, one of which is Shoutmix.

Here's How to Create a Guest Book / Shoutbox with Shoutmix

1. Open Shoutmix.com then register yourself. Pendaftarnnya way quite easily.

2. If your application directly managed given the choice of the type provided shoutbox. After that, click the Continue button.

3. Click the link Go to My Control Panel Now. There you can Shoutbox first setting, for example, Style & Color, Date & Time, and others.

4. Then click Get Codes and set the height and width of your Shoutbox. Then copy and paste the script in the box Generated Codes.

5. Login to your Blogger account.

6. Select Layout » Add Page Elements » HTML / Javascript.

7. Paste the code that you copied into the Content box.

8. Click Save.

Shoutmix widget now you're ready and has appeared on your blog.

Good luck ...

Don't foregt to leave a comment...

read more »

Join InstaForex Get 30% Bonus!

Spread this Blog!Bookmark This Blog!

Facebook Twitter Google Buzz Delicious Digg Stumbleupon Linkedin
Yahoo! Bookmarks Google Bookmarks Reddit Mixx Technorati Subscribe via Email Subscribe via RSS Feed
Blogger Driver FeedCount
Receive our updates direcly to your inbox
Please fill the form below:

Chatbox

Followers

Visitor Traffic